Showing posts with label gear. Show all posts

Friday, January 31, 2020

Rooftop Storage: The MegaWarrior (Yakima)

Yakima MegaWarrior Rack on my 2011 Kia Sorento
When we began planning for our Epic Adventure 2, we knew we had a smaller vehicle than when we had done our previous long road trip. We also had bigger kids and a bigger dog. So we were looking for ways to maximize space. Of course we looked to the roof rack which I have used in the past. However, I wanted to have a better way to organize and contain gear. I knew some of the gear would be smaller (i.e kids razor scooters, bottle jack, spare gas can, etc.).  Enter the Yakima MegaWarrior to save the day.

Yakima MegaWarrior Rack on my 2011 Kia Sorento
Yakima makes two models of roof baskets. The LoadWarrior is the smaller of the two and is comparable to most other roof baskets out there. At 39 inches wide and 44 inches long, it does provide some decent rooftop storage. The MegaWarrior is the larger of the two and the one I chose. The MegaWarrior is really designed for larger vehicles but it can fit any size since it just clamps to the cross bars. At 44 inches wide and 52 inches long, it provides 45% more space than the Load Warrior. The MegaWarrior also has an optional 22 inch expansion which adds another 40% space increase (though I wouldn't add that unless you have an Expedition or Suburban or something else with a long roof). The width of the MegaWarrior is an intimidating look that does stand out with an average size vehicle. If you don't want your rack to dominate your vehicle lines, then opt for the smaller LoadWarrior.

Yakima MegaWarrior Rack on my 2011 Kia Sorento
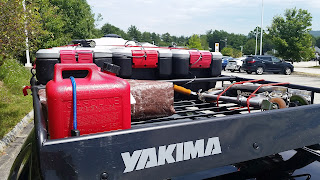
Note: I do use bike cables to lock the action packers to the rack.
I can fit three 8-gallon Action Packers across the MegaWarrior. After measuring, I concluded that I could technically get 6 of those Action Packers on the roof (in two rows) and still have room in there. Obviously, the more gear you add to the top the more your gas mileage will suffer and the more your center of gravity will elevate. So you need to make sure that you aren't overdoing it especially if you'll be off road. Also, you'll need to take slower turns with the rack loaded down. You need to check your manufacturer's specifications for the amount of weight you can put on your rack/roof. The MegaWarrior weighs 35 lbs so you'll need to deduct that from the weight limits. So if you're manufacturer says 200 lbs is the limit, then with a MegaWarrior up there your limit is really 165 lbs.

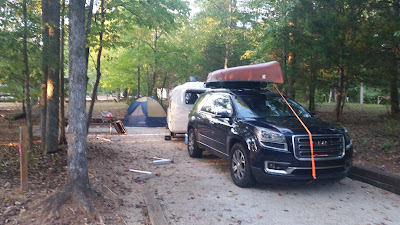
canoe on top of the Yakima Roof Basket on our 2015 GMC Acadia
I use the roof rack regularly to pack items on. Even my fishing poles get tied up there. I love it and expect it to be useful for years to come.  I also like that I can tie a tarp off of it for coverage if I need. I've put my canoe up on it without any issues. Typically, I carry the kids scooters, a tarp, and the action packers. You may be wondering what I put in the action packers, well that varies but cooking supplies, food, tools, kids games and toys, are some of the things I've packed in them over the years on different trips. Since our big trip in 2017, our Kia was totaled when someone ran into it at an intersection (everyone was ok). We've since bought a 2015 GMC Acadia and have the roof basket attached to it and have used it for trips and adventures. Overall, a roof basket can get you that little bit of extra space you need when traveling at a small sacrifice in gas mileage.

Monday, October 3, 2016

Coleman 1-Burner Butane Stove Review

I've been using a Coleman 2-burner propane stove for years while car camping and camping with the U-haul camper. One of the burners on it went out after ~15 yrs of use. I may try to repair it, but in the mean time I was looking for a single burner stove that was quick an easy to use.

I like to cook outdoors, especially in the fall. (I always try to cook bacon outside on the back deck so I don't have to clean up the grease splatter in the kitchen.) I have a grill but not one with a side burner. So I went looking and researching for one that I could use at home, at the park, or while camping. I stumbled on the Coleman 1-Burner Butane Stove. You'll want to shop around as I've seen the price vary from $16-35.

This stove runs off butane instead of propane like many other camp stoves. The canisters are a bit smaller and should last at least an hour on full flame/heat. The nice thing about this stove is how easy it is to hook up the fuel. I've used a lot of different stoves over the years and most of them use a threaded design. This can be trouble for older children you're trying to teach how to use one and help out, older adults, and folks with dexterity issues (like rheumatoid arthritis or hand injuries for example). With this stove you don't have to thread/twist the canister on. Just drop it in the slot and push down on a lever that locks it into place and pressurizes the system. Then just turn the knob past max till it clicks and the igniter sparks into the gas. It's that easy and you're cooking!

There's other things I like about this little stove too. Check out my video review to see how easy it is to operate and what else I like about it! Whether you're using this for camping, boating, back yard BBQ, or as an emergency cooking source when your power goes out, it's a great versatile addition to your gear.

Click here to view the video on YouTube.

Click here to see my follow-up video to answer some questions.

Amazon source for fuel for these if you can't find it local.

Tuesday, June 30, 2015

Coleman Beach Shade Review Follow-up (Video)

Previously, I did a review of setting up the Coleman Beach Shade that we got for our trips to the beach to replace the umbrellas. Well we took it to Hilton Head Island, SC for a beach trip last weekend. Here's a follow up video below of how it held up even through a big thunderstorm. More details below the video.

3 Highlights from using it at the beach:

  1. This tent will stand up to at least ~15-25 mph winds.
  2. You need to buy a few more stakes to really help secure it on a windy day.
  3. It will take 2 people to put up or take down during wind.
So first, I didn't have many problems putting it up. Again the mesh where the poles go through proved to require more effort to not catch on the mesh. They really should make them like normal sleeves. The mesh pole sleeves are my biggest complaint about this tent. The tent comes with 6 stakes but I'd feel more comfortable with 8. I will be adding at least 2 more to my kit. The front mat/door has stake points under it when down as a mat that would likely have limited some of the wind going under it. So do grab a few extra stakes.
Guy lines. These are really important to get them right as they are one of the keys to keeping the tent down and helping it maintain it's shape during windy conditions. DO NOT USE stakes on the guy lines! Unless you are going to use heavy dute dog tie outs (which is an option) they'll flex and pull right out of the ground. One of the great things about the Coleman is that they also give you sand bags (in addition to the stakes). Here is the one key to using sand bags that will keep your tent there while everyone else's is blowing down the beach. Fill them and BURY THEM! That's right, a sand bag on top of the sand will just slide and slow down a tent that's moving. it will not keep a tent from moving. Fill the bags and dig a 1-2 foot hole to bury them in. Pack the sand down on top of them and your tent won't go anywhere. Seriously, our tent was the only thing left on the beach after the major thunderstorm hit. Due to the lightning, we had to leave the beach with the kids and seek shelter. I would've been happy to ride it out inside the tent. I strongly believe we'd have been fine.
I checked the weather charts and the winds were a good 15-25 mph. During the afternoon while we were there. While the tent stayed put the entire day without any issues, packing it took some effort. It was really windy when we left so it took two of us to pack it down. I pulled the sand bags and the poles out and my brother-in-law sat on the tent to hold it down. then I pulled out the stakes one at a time and folded the tent (with my brother-in-law moving to stay on top of it the whole time till I got to the point to roll it up).
All around I'm glad we had it and it worked well even with me wishing it didn't have netted pole sleeves and wanting to add more stakes. I wouldn't put it up for a short beach trip; too much effort to me. But for a full day on the beach it definitely works. It's more sturdy than an umbrella and a heck of a lot lighter than carrying a tailgate tent.
Coleman Sunshade

Monday, March 23, 2015

Coleman Beach Shade Review (Video)

Coleman Sunshade After our trip to the beach last fall, we decided to ditch the beach umbrella and move to more of a shelter/shade. We looked around and read lots of reviews. We found a good deal at Amazon on the Coleman Beach Shade. So that became one of our Christmas gifts to ourselves. I've been waiting on winter to end and a few days of sun to set it up in the yard and make sure it's all there and that I know how to do it. (I'm a big advocate of putting up a new tent/canopy at home prior to using it on a trip.) Here's a video below of my review and setup of it. More details below the video.

It went up pretty easy. I would say it took me about 10 mins to put it up by myself. It's fairly simple with only 3 poles: 2 black ones that go front to back in a parallel manner, and 1 longer grey one that crosses perpendicular to the black poles. The grey pole took a bit more care to thread through the mesh netting. It didn't slide through like most tents do. When I took it down I had to concentrate on unthreading the grey cross pole carefully too. It's really not that bad though and the first time you do it you will see where the trouble spots that it's likely to get caught are at. I expect to put it up faster in the future now that I know where those are. Due to that, it might be easier to have 2 people to get the grey pole in place and the ends locked into their grommets.

The design seems fairly good. The ends of the poles are tapered a bit to easily fit in the grommets. The grommets seem secure in the webbing at the base. It provides a decent amount of shade considering how small it packs down. Also, you can zip it up totally to make a changing room if you need one (though it might get hot without leaving the doors/windows cracked some for ventilation).

I think it will serve us well. I will follow up with further review after our next beach trip. We might even find other uses for it at other outdoor events.