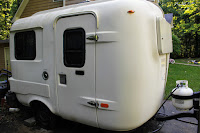
Door sag. It's annoying to say the least, but it's also a sign of some other issues. So catching it early can save you some bigger repairs later. The door hinges on the U-Haul campers are Polar hinges. Same kind that are used on industrial freezers. The original hinges are model 402, but they don't make them anymore so you may have to grab model 412 if you do need a new hinge. The hinges are not cheap, right now I've seen them running around $30 something a piece. Most of the time the weak point isn't the hinge though since there made so durable. It's the screws, bolts and wood that they attach to that fails first.
 |
| Out with the old. |
Inside the camper you can find where the hinge bolts are as they're behind the little black 1 inch caps on the door and panel next to the door. Pop those caps out and you'll have access to the back end of the bots. The nuts on mine were rusted solid to the bolts, and they had worn out in the wood. So they were loose on the lower hinge (door side). I had to hacksaw mine off. I recommend replacing the nuts, bolts, and screws with stainless hardware. Stainless is more expensive but it doesn't rust. And trust me you don't want to have to replace these in a year cause you bought cheap hardware. Where the door hinges are, there is wood fiberglassed inside the door and wall to mount them too. Sometimes due to wear or a leak, this wood can start to rot. Depending on how much rot you have, you may be looking at a bigger job by having to replace those wood pieces. If you are lucky, like mine fortunately, you may catch it before a lot of damage. With mine, the lower hinge on the door side were seeing the 2 bolts wearing out and being loose. Also someone had previously put cheap screws into the screw holes which were rusting so I was going to change those at the same time.
 |
| In with the new. |
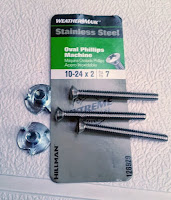
I used 10-24x2in stainless Oval machine bolts which matched up to what was there. Some folks have used flat washers and lock nuts. Due to wear I could tell the holes in the wood had worn out some and were a bit bigger than the 10-24 bolts. So I opted to go with t-nuts. The t-nuts are designed to dig into the wood and grip against it vs just being a bolt against a washer. I put the new hardware in after using the hacksaw to remove the old ones. I also removed the rusty screws and replaced with 10-24x1in stainless screws. My screws were a bit longer so that they could dig deeper into the wood than the original. This job can be easier if you have a friend willing to help. Then one of you can work from the inside and one from the outside. Also be careful backing out rusty screws as they can sometimes tear up the wood on their way out if they've rusted a lot. Take it slow and use a hand held screw driver not a drill.
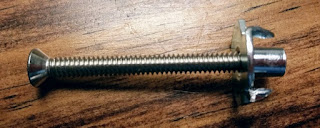
Tip: When working with tiny bolts and the t-nuts in the tiny openings, you can't fit your fingers ( could only fit one) in there to thread the nuts on the bolts. So what I did was take another bolt and back screw it halfway into the t-bolt and then use that to help thread it on the bolt from the front. Once the front has gotten halfway threaded, I backed out the other bolt and tightened the front bolt down. I did use my finger to push the t-nuts against the wood and hold them while tightening.
 |
| T-nut back threaded halfway with bolt to hold in place in hole while threading the regular bolt through the wall of the camper. |
With the new hardware the hinges are again secure. Hopefully, I won't see any more bolts coming loose when I'm driving and the door will be more secure. All in all a quick maintenance job.


