Showing posts with label maintenance. Show all posts

Wednesday, April 15, 2020

Camper Electrical (Part 2: Converter upgrade)

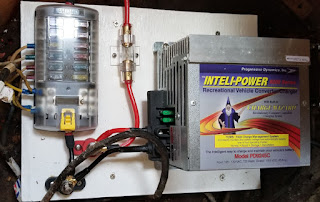
Progressive Dynamics PD9245C with Blue Sea Systems 12 circuit fuse block
With the COVID-19 quarantine, I've found some more time in my schedule due to kids events/sports all being canceled. This has allowed me to start to tackle some camper projects that have been on the list for a while. The converter upgrade and some electrical updates were on the list for a while. As a matter of fact, the first post I did on the camper electrical was from 6 yrs ago! Feel free to check that one out for an overview of the system and early updates. (Note: In this post, I'll link to the manufacturer site for items I used so you can get the most up to date and complete info on the equipment, but I did buy a lot of it via Amazon when I could.)

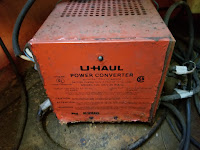
Original Uhaul Camper Converter
I really have to give credit to U-haul for making these things well so they just run and run. I bought a converter a few years ago to replace the original, but we didn't have any issues with the original so I just kept running with it. It finally died last year. The old converter had a fuse block built in using glass tube fuses. The old converter, being from early 1980s wasn't smart enough to adjust charging rates so as to not "cook" a battery if left plugged in. So I was specifically looking to upgrade that capability when I went looking for a new one. Based on my load calculations, I settled on the Progressive Dynamics PD9245C 45 amp converter. This converter differs from the original in that you have to get and wire in a separate fuse box. (Some folks have moved to a PD4045 which is more of an all in one solution but you need to cut an opening somewhere under the bed/table area to surface mount it.)
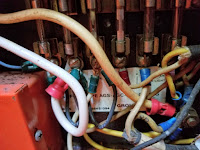
Fuse board inside the original Uhaul Converter

Molded fiberglass campers, I've found, have a lot in common with boats. So when I started looking for 12v electrical components, I researched some 12v boat applications and suppliers. I settled on a 12 circuit fuse block with negative bus from Blue Sea Systems. This would give me enough room to expand beyond the original 6 circuits. I've used the 6 circuit block in the back of my Jeep for expanded needs along with Blue Sea 12v sockets and usb charging ports and have been satisfied with their equipment. I decided to move from the glass tube fuses to regular automotive spade fuses which is why I went with that specific block cause they're cheap and easy to find (and I carry spares for the car anyways). The negative bus is also a nice feature for the camper since most of the existing wiring is 2-wire. The original had a single connection point for all the grounds to connect to. The other major components I added were:


Blue Sea Systems 12 circuit fuse block
I built a small elevated platform to mount everything to and to help me organize it. The old converter was directly wired to the AC system and the new one came with a male plug. So I got a female plug from Lowes locally and wired it in to the existing original power line. The converter is connected to the distribution posts. Those in turn are connected to the fuse block and negative bus. The positive line has the 80 amp inline fuse for protection of the block. (Note the block is rated to 100 amps so I'm well below that rating.) I should never really be pulling anywhere close to that amount since I'm only using LED lights, Fantastic Fan, a few 12v charging ports, and the stove hood (I removed the original heater so that's not a load anymore). The battery will be connected to the distribution posts also (more to come on this). I put the pendant and capacity monitor in place of the old analog capacity monitor near the door.

new charge control pendant and digital battery monitor
I was able to install the new setup and hook up the original wiring without any issues. I have not hooked up the battery yet as I am planning to move it from inside to the tongue of the trailer. I also did not hook up the old solar panel and solar charge unit as I know that the original panel is not working anymore. I plan to look into solar in the future. I did run into one issue which was the GFCI outlet above the sink was bad and kept tripping. After taking it out and testing it on a single circuit by itself, I determined that I needed to replace it.

12v socket/ USB outlet combo

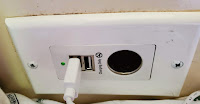
4 USB charging portsWhile I was working on the 12v side of things, I also made a few more updates. I pulled out the old ash trays on either side of the main bed/table area and replaced them with a 4 port USB charging socket and a 12v socket/2 USB charging port socket and wired these into 2 of the extra points on the fuse block. I also did some lighting updates that I'll go into more detail on in another post.

I hope you find this helpful if you decide to dive into redoing electrical in your camper. Next on my list is to build onto the tongue to house the battery up front and wire it into the system. I'll post details on that once I get it completed.


Monday, November 13, 2017

Wheeling

our U-haul CT-13 Fiberglass Camper in front of a train in Scranton, Pennsylvania
I was lucky when I bought the trailer as it came with 3 wheels. All of them were original U-haul wheels with the nubs to mount baby moon hubcaps. (though I wasn't lucky enough to score a set of the U-haul stamped baby moons)  The rims were in rough shape so I painted them black as the easiest way to get them with some uniform look. When I was looking to put the second spare tire mount on my tongue, I needed to get a 4th wheel. Fortunately, you can order them from U-haul truck parts Ebay shop (here).

new and old wheels for our Uhaul CT-13 Fiberglass Camper
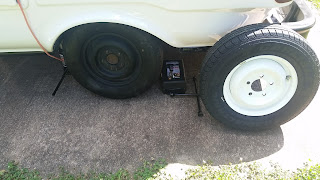
The wheels are a nice clean white which match the new paint job well. (The newer wheels do not have the bumps to hold baby moon hubcaps though. So if you're looking for that style you'll need to find original wheels.) I opted to buy 2 new wheels and make them my main wheels and use the originals on the spare tires. I took the wheels and tires to my tire shop and had them swap them around. A new spare tire went on one of the old black rims after the tires from them had been moved to the new white rims. When I got back home I put the new white wheels on the camper and mounted the black rims on the 2 spare mounts. Having 2 spares for our 4000 mile journey was a huge comfort, especially since we'd be leaving the US on this trip.

Just for information, I use Carlisle Radial Trail (the existing tires were RH and the new spare is an HD) tires for the camper. Greenball is another highly recommended brand. Don't just buy the cheapest brand that you would normally throw on a small utility trailer that you don't use everyday. While you may not be using the camper everyday, you want something more dependable due to the number of miles you will drive when you are using it and the weight, heat impacts and bounce.  After all, it's better to not have to use your spare. For more info on tires see my earlier post.

wheels and rusty lugs/nuts on our Uhaul CT-13 Fiberglass Camper
The old lugs and lug nuts were very rusty. The old lug nuts were open-faced which allowed more rust issues on the lugs than a closed-faced lug nut. I bought some new chrome 12x1.5 close-faced lug nuts to put with my shiny new wheels. Next I tackled the rusty lugs with a wire brush to clean them up. (You can see my video on removing rust from the lugs if you need to do this.)

new wheels and lugnuts on our Uhaul CT-13 Fiberglass Camper
I like the new look. It's very clean and fresh looking. I'm currently on the search for chrome center caps to install to finish the look. I'll update when I find some that fit. Everything held up well on our big trip this summer and thankfully we didn't need to even use one of the spares.

Monday, June 19, 2017

The Second Spare


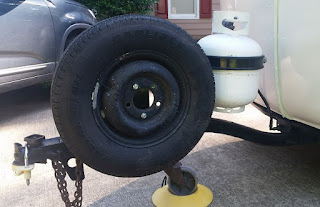
new spare tire mount on Uhaul Camper CT-13 tongue
Previously, I had mounted a spare tire on the rear bumper. With planning for another long trip coming up, I decided I'd like to add a second spare to the tongue. I bought the same adapter I had used before. The question was, where to mount it as the tongue is a very busy place. Between the propane tank holder, jack, handle, and coupler, there's a lot already going on there. Then add the wiring and you have to make sure if you drill new holes somewhere that you're very careful where.

I opted to use existing holes. The coupler is attached with three .5 inch hex bolts and has the handle welded to the top of it. The tire mount comes with 4.5 inch long .5 hex bolts. These are the same size just longer. So I removed to rear two hex bolts from the coupler and attached mount there without having to drill new holes. I used the bottom holes because they are spaced perfectly and I wanted the tire to be high so no chance of it hitting the ground. I had to mount on drivers side due to the jack being on the passenger side. I also had to make sure because the bolts were long that they pointed the right direction so the tire could mount flat against the side of the tongue (didn't want them poking or rubbing a hole in the sidewall). The back plate that came with the tire mount wouldn't work as it was too thick and blocked the jack from swinging into place. So I got a kit at the auto parts store for hanging leaf springs and used a U-bolt from the back to add a little more support. I may keep my eyes open for a thinner back plate or try to make one in the future but for now it's secure.

back side view of new spare tire mount on tongue of Uhaul CT-13 camper

I think this will work out and was an easy mod. Having 2 spares on the trailer is a good insurance policy for the long hauls. I've also bought a bottle jack to keep in the trailer.

Wednesday, June 14, 2017

Lets Talk Hinges

Polar 402 hinges on U-haul Camper (CT-13)
Door sag. It's annoying to say the least, but it's also a sign of some other issues. So catching it early can save you some bigger repairs later. The door hinges on the U-Haul campers are Polar hinges. Same kind that are used on industrial freezers. The original hinges are model 402, but they don't make them anymore so you may have to grab model 412 if you do need a new hinge. The hinges are not cheap, right now I've seen them running around $30 something a piece. Most of the time the weak point isn't the hinge though since there made so durable. It's the screws, bolts and wood that they attach to that fails first.

Old bolt and nut from door hinge.
Out with the old.
Inside the camper you can find where the hinge bolts are as they're behind the little black 1 inch caps on the door and panel next to the door. Pop those caps out and you'll have access to the back end of the bots. The nuts on mine were rusted solid to the bolts, and they had worn out in the wood. So they were loose on the lower hinge (door side). I had to hacksaw mine off. I recommend replacing the nuts, bolts, and screws with stainless hardware. Stainless is more expensive but it doesn't rust. And trust me you don't want to have to replace these in a year cause you bought cheap hardware. Where the door hinges are, there is wood fiberglassed inside the door and wall to mount them too. Sometimes due to wear or a leak, this wood can start to rot. Depending on how much rot you have, you may be looking at a bigger job by having to replace those wood pieces. If you are lucky, like mine fortunately, you may catch it before a lot of damage. With mine, the lower hinge on the door side were seeing the 2 bolts wearing out and being loose. Also someone had previously put cheap screws into the screw holes which were rusting so I was going to change those at the same time.

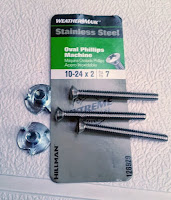
New bolts and t-nuts for door hinges.
In with the new.
I used 10-24x2in stainless Oval machine bolts which matched up to what was there. Some folks have used flat washers and lock nuts. Due to wear I could tell the holes in the wood had worn out some and were a bit bigger than the 10-24 bolts. So I opted to go with t-nuts. The t-nuts are designed to dig into the wood and grip against it vs just being a bolt against a washer. I put the new hardware in after using the hacksaw to remove the old ones. I also removed the rusty screws and replaced with 10-24x1in stainless screws. My screws were a bit longer so that they could dig deeper into the wood than the original. This job can be easier if you have a friend willing to help. Then one of you can work from the inside and one from the outside. Also be careful backing out rusty screws as they can sometimes tear up the wood on their way out if they've rusted a lot. Take it slow and use a hand held screw driver not a drill.

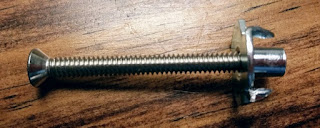
Tip: When working with tiny bolts and the t-nuts in the tiny openings, you can't fit your fingers ( could only fit one) in there to thread the nuts on the bolts. So what I did was take another bolt and back screw it halfway into the t-bolt and then use that to help thread it on the bolt from the front. Once the front has gotten halfway threaded, I backed out the other bolt and tightened the front bolt down. I did use my finger to push the t-nuts against the wood and hold them while tightening.
back threaded t-nut
T-nut back threaded halfway with bolt to hold in place in hole while threading the regular bolt through the wall of the camper.

With the new hardware the hinges are again secure. Hopefully, I won't see any more bolts coming loose when I'm driving and the door will be more secure. All in all a quick maintenance job.

Thursday, June 8, 2017

Facelift

U-haul Fiberglass Camper with fresh paint
I got a good deal when I bought our little camper years ago, but it did need some work. I've gradually spent time and a little money over the years to upgrade and replace/fix things. Two things have been on my list for a long time: paint and replace the patched in plexiglass side window.


old plexiglass window
Old Plexiglass Window
New Old Stock Window
Someone had busted out the original side window in the past and of course hadn't saved the frame. Some previous owner had stuck a chipped and cracked scrap piece of plexiglass in there and then calked it up real ugly. Due to that, the window had no way to open to provide ventilation on that side. Several years back a company that specialized in selling surplus from warehouses, opened a crate they'd gotten their hands on. Inside were a bunch of windows with Uhaul stamped on them. Well they posted them for sale on their website. Didn't take long before a group of us stumbled on them and they were sold out in a couple days. NOS (New Old Stock) Uhaul windows for the campers that Uhaul had claimed they didn't have any for years. At some point they had a batch of replacements and had gotten rid of them I guess while cleaning out a warehouse. I talked to the folks at the company and they said they bought a bunch of stuff in crates from somewhere all site unseen. They had no idea what was in the crates till they opened them at their warehouse. And even then they didn't know what they went to. So with luck I landed 2 of them a right and left side. (I have the other as a spare in case one of them ever gets busted.) Well this week I finally got that installed by a window guy. Thrilled to have finally gotten around to it.


U-haul Fiberglass Camper before fresh paint
Before New Paint (but freshly cleaned)
U-haul Fiberglass Camper with fresh paint
After New Paint (Shiny!)
The one thing that is the most noticeable about the camper has always been the outside of course. Mine had lost most of it clearcoat and shine years ago and was mostly chalky and rough. It made it difficult to keep clean and when you did clean it, it was a chore. I had a couple of options: paint or wax. When adding layers of wax to the fiberglass campers,you have to use a lot of it. Most folks go with a ZEP floor wax and put on 5-6 layers. This gets it shiny but also leaves imperfections visible. You have to use barkeepers friend or similar product to really clean and whiten it. Mine ha a fiberglass patch that was visible and some discoloring due to water from rusty drain hole in rear window running down the back of it. With painting, the wife and I discussed what color for 2 years before we decided to keep it white. I took it to my bodyshop guy and he did her up nice with a new coat of paint in Super White. Now she's shiny and clean looking. He even painted the rock guard to match. It was a hard plastic with a rough finish to it and a bit yellowing. Now it's smooth and the same color as the camper. All in all, I'm happy we finally got her done up right. I feel the paint adds more to the value of the camper than just a wax job.

So with the facelift done, I'm turning my focus to some other tasks as I prepare for our next big adventure with her. More updates to come over the next month or two as we continue some work and find some time work in adventure.

Monday, May 12, 2014

Bunk Bed Stability

Rubber cone-shaped bumpers for bunk bed support in Uhaul Fiberglass Camper
Rubber Cone-shaped Bumpers
So as I mentioned in a previous post, I've gotten around to resolving one of the issues with the top bunk. The poles from the top bunk do rest in these little indentions and rely on gravity/weight to keep them in there. The problem with this for me is if the lower kid kicks the pole or the upper kid jumps up and down, it feels like they could slip out. Many folks have tried and suggested various options. I want to keep the ability to break down the bunk (so I didn't want to make it permanent). I ordered some conical bumpers that measure 21mm x 12mm. I then picked up some #10 x 3/4 in. wide head screws at the local hardware store. (If you don't have the wood braces under the fiberglass, you should put some in.) I then screwed these right into the wood braces and they worked perfectly. The poles slide on and off easily but the diameter and height of the bumpers is enough to keep them from bouncing off should they be kicked accidentally. Also, the rubber bumpers are low enough to leave there with the cushions down. So no need to take them off when not using the top bunk and there are no sharp or protruding screws/bolts/etc that some folks have used. All in all I'm happy with it and we'll try them out on the next trip. I'll definitely post an update if they don't work as good as I imagine.
adding cone-shaped bumpers to hold bunk bed legs in a fiberglass Uhaul Camper

See my post on replacement poles for the bunk bed if you're looking for those.

Monday, April 28, 2014

Bunk Bed (Camping with Kids)

Front Bunk Beds for Kids in U-haul (uhaul) Fiberglass Camper
So we have 4 people in our family and so it was important to get a camper that would sleep 4. The U-haul CT13 campers do sleep 4. The adult bed is in the back and then the front bench pops up into a bunk.The back cushion is on a hinge similar to a piano hinge and the back cushion swings up. Two poles fold down and each rests in metal indention on the bottom. This style is common across other fiberglass campers.

There are a couple of problems with the design though:
  1. There is nothing on the top bunk to keep a kid from rolling off during sleep.
  2. A really small kid (2-3) on the bottom bunk could potentially roll off between the poles. 
  3. The poles rely on gravity/weight to keep them in the holes. They are not fastened to it any way and can bounce out. Or it's possible for a child on the lower bunk to kick it out during sleep. This could potentially cause the bunk to come down. (Do not drive with the bunk setup; road bounce will make it come down!)
My first concern was to make it safe for our kids. At the time we bought the camper they were 4 and 2 years old. I use the front bench during travel to hold the screen room and our table and some other gear we pack to keep weight up front on the tongue. So whatever designs I came up with would have to be flexible and not impact the ability to break down the bunk to a bench.

Bunk Bed Rail for U-haul (uhaul) Fiberglass Camper
View of wingnuts on Bunk Bed Rail for U-haul (uhaul) Fiberglass CamperThe top bunk is backed by a piece of plywood. I picked up a couple of right angle shelf brackets and had an extra board laying around that turned out to be the right size. I used some wood screws to hold the brackets to the bottom of the bunk. I measured them so they could stay attached and be under the bench cushions when it's folded down. The distance measured is between the bottom cording of the top bunk cushion (when it's folded down as the back of the bench) and the top of the fiberglass bottom of the bench with cushions removed. I can put the cushions on the bench on top of the L brackets and you won't even know they're there. I then drilled holes in the wooden board and got a couple of nuts with locking washers and wing nuts to fasten the board. That way I can quickly unfasten it for travel. This provides the protection I needed for my 4 yr old not to roll off the top bunk in the middle of the night. It's been working very well for us. The reason I went with a board was because I didn't want a gap from pvc or other tubing that he'd get his legs caught in. The solidness of the board combined with the small curtain we put up that hangs from the ceiling also help provide the sense that it's his own room. I have a small Tupperware container that I keep in the cabinet over the stove that I put the nuts, washers and bolts in when I have it broken down.

Curtain for lower bunk in our Fiberglass U-haul (uhaul) Camper
My wife's fun camping fabric.
Close up of Curtain for lower bunk in our Fiberglass U-haul (uhaul) Camper
Close-up from back side
With the 2 year old going to be in the bottom bunk, we were concerned with her falling out between the poles. While discussing how the kids would probably go to bed earlier than us, my wife decided that a curtain would be a fantastic way to divide the camper into basically two rooms. But a large curtain hanging all the way down wouldn't work for several reasons. First it would be too heavy for suction cups and with the curve of the roof we couldn't make a curtain bar work. So we brainstormed and came up with the idea to take a fun cloth shower curtain my wife had found to make new window curtains for the front window and make a short curtain across the top and make a second one on the bottom. The top one is held by suction cups across the top. The lower one we designed to be a panel that slipped over the bars that support the top bunk. We sewed two sleeves that fit perfectly around the poles so you can slide it on. With the poles setup, it's tight and makes the bottom bunk a dark little cave. There's no way she's rolling out of there!

To resolve the issue of the poles possibly bouncing/sliding out of their hole, I looked at rubber bumpers. I have ordered some conical bumpers that measure 21mm x 12mm. My camper has wooden boards under the lower fiberglass to help transfer the weight of the upper bunk poles down through to the frame without cracking the fiberglass seat area. With a screw, washer and these rubber bumpers, I should be able to secure the poles pretty easily by having them slide over the bumpers. I'll post an update when this is done with pics. (EDIT: Post on bumpers.)

Front Bunk Beds for Kids in U-haul (uhaul) Fiberglass Camper
Kid's Bunk in our U-haul Camper
The kids love their "rooms". It's amazing with a little creativity how you can divide such a small space into more personal spaces. I close the rock guard on the front window every night to help the top bunk remain just as dark and cozy as the bottom one so my son can sleep good. We got a couple of camping themed twin bed sheet sets for them that we make up the bunk beds with. We also got two husband pillows similar to these that go at the head of their beds (left side of camper) providing some insulation and filling the small gaps. You can see the edges of them in the picture to the left. By adding some small led camp lanterns to light their rooms, they're happy and set. Now they can have their own personal space in our tiny camper to play with dolls, cars, and read books. I'm currently looking at some storage ideas to better organize their little "rooms."

(Update: See my post on replacement poles for the bunk bed if you need those.)

(EDIT: Post on the other bed; the one us adults use. )


Wednesday, March 19, 2014

Camper Electrical Part 1

So electrical is a big part of any camper. Let me start by saying the Uhaul's come in two models: CT13 and VT16. Mine is a CT13 and so that's what I'll be talking about here. Though much of this is the same across many campers. It can also be confusing unless you understand that there are 3 electrical systems in these small campers:
  1. AC (120V on a 15 or 30 amp circuit). This is your normal household current and the receptacles in the camper look like a typical household plug. If you're not plugged into shore power then your items that rely on this won't work.
  2. DC (12V). This is the items in the camper powered by your battery and converter. Most of the internal lights, fans run off this. This is the same 12V power as your car. Unlike in your car where you have an engine turning an alternator to produce the electrical current, campers have a converter. It's a device that converts the AC to DC and charges the battery. 
  3. Trailer lights (brake, turn, running). While the AC and DC systems are connected by the converter, the trailer light wiring is totally isolated from the other systems. It's power comes from the tow vehicle via the 4-, 5-, or 7- pin adapter that you hook up when towing. It includes the brake lights, turn signals, and running lights. 
I started with the AC system. One reason is because I was replacing the dorm fridge in my unit. These units originally came with just an ice box. But mine, like many I've seen, had been ripped out in favor of a fridge. I happened to have a slightly larger, stainless model that I used to use at my office at my old job. I had it in storage since I changed jobs and decided to replace it cause it looked better than the old brown one the previous owner had installed. 

I also had been having an issue during our first two trips with the thermal circuit breaker popping. After carefully adding up the amps I was using when it popped, I was way under 15 amps. So this led me to the conclusion after a little research that the old thermal breaker was worn out. These breakers do tend to pop at lower and lower voltages as time goes on. So 30 yrs later, this breaker was shot. I managed to find a replacement online. So I ordered one of those to install.
utility hookukp box on driver side of Uhaul camper with water and electric

So first things first. Shore power comes via an electric cord that is stuffed inside the shell. It comes out the utility port on the driver side. You pull it out to plug in. When you're done, you can push the cord back into the wall of the camper. I may end up replacing the cord in the future if I decide to upgrade to a 30 amp system. If I do, I'll replace it with 10-3 type SJOOW electrical cable.
electrical diagram of Uhaul CT13 camper from manual
Inside electrical outlet box in Uhaul CT13 camperThe power cord goes up to an electrical box where the single outlet and pop-out circuit breaker are on the side of the cabinet over the sink. There is another cable that goes out from this box to the converter (to convert the AC to DC to charge the battery and run the lights/fans while plugged into shore power). The previous owner of mine had run another cable from her down to the area below the sink with a female plug on the end to plug the dorm fridge into.

thermal pop-out button circuit breaker on Uhaul CT13 Camper
First thing before you begin working on AC is to make sure you're not plugged into shore power. Next I took off the outlet and separated it from the box. Then unplugged the circuit breaker and replaced it with the new one. I got a Sea Dog 15amp thermal push button breaker. I had to widen the hole a little bit as the diameter of the new one was a big larger than the old one.

extension cord with outlet box in cabinet below sink in Uhaul CT13 camper
I decided a few more outlets would be helpful. After cutting the fiberglass to widen the fridge area to fit my new larger fridge, it's a messy job and I'm afraid I may not be as skilled at patching holes in fiberglass. So I wanted to limit holes. I picked up an 8-ft, 4 outlet shop extension box from Lowes. I liked that it has it's own circuit breaker built-in and an on/off switch. I connected this to the extension from the top cabinet. I cut a hole in the sized of the cabinet under the sink (it's plastic and easier to deal with). I then put a couple screws in and hung the box on high on the back wall of the cabinet. We don't use that cabinet for much and nothing tall so it was a good spot. I plugged the fridge into that box and it leaves me with 3 outlets without having to install boxes and face plates.

As a side note, I cut a piece of an old rubber car floor mat and riveted it to the side of cabinet over the hole I had cut. I then slit the rubber so I could pass the plugs through. It was a quick way to cover the hole and hopefully provide a little insulation and better looking to me than an open hole.

I'm happy with the outcome. I may go back and upgrade to a 30 amp system at some point. The new pop-out circuit breaker fixed the problem I was having. I'll dive into the other electrical systems in the future as I tackle them.


Tuesday, March 11, 2014

Rain, Rain Go Away

So the first thing I discovered with our new Uhaul was the leaks. Due to the way the windows are made and mounted, as the old parts wear out the tend to leak. Most Uhaul owners have to deal with this at some point. Try not to silicone if you can. It's a mess to get off later. That being said I have patched some areas with roofing sealant in small doses. I found out a couple of ways to deal with our leaks.

1) Limit the amount of water running over the window.

This is a no brainer. If the window's leaking then a percentage of the water running over it is coming in. So decreasing the amount of water running over it will decrease the amount coming in. This is not a final answer as during heavy down pours you're going to see a lot of that water still coming in. However as a first step to resolving my leaks, I decided on gutters. Now you can figure out how you want to do those, if you want to make your own or use window shields. I went with a vinyl product that's pretty simple to work with and uses heavy 3M bonding tape vs drilling holes in the side of the fiberglass.

 EZE Gutters

Uhaul Camper Passenger Side Window with EZE RV Gutter
Basically you can buy this by the foot and it comes in a long roll. Then measure out where you want and cut. I think I used a pruning shear to cut it and then finished the end with a box cutter. You want to make it curve down on the sides a bit. This is will help make sure the water channels correctly. From my experience this definitely helped.

I also had problems with the door leaking and used some extra I had inside the top of the door to make a channel. I'll have a separate post about that coming up.


2) Clean out the window traps.

On these windows there is felt in the tracks. (that you can replace if you want to take the window apart and drill out the rivets. There's a guide on FiberglassRV site to do this. Also a PDF of that thread exists here.) There is also some drain holes. Mud and yuck tends to build up in these tracks. and can block the drain holes. So before you go tearing your window apart to replace or grabbing a sealant, clean out the tracks. You'd be amazed at how much that can do. There was so much gunk and bugs in my rear window track that the water caught in the track would backup through the felt and bubble up the inside track.
Uhaul camper window track closeup
Here's how you should clean them. First pull up the seal. Go ahead and pull it all the way out. You'll want to clean it out/off. I thought about replacing it but haven't found replacement yet. Now get some tools and get in there and clean out that track where the seal sat. You may find dirt, grime, and all sorts of yuck. You may find a small flat head screw driver and an old toothbrush helpful here. Some silicone spray will help. Make sure the drain holes are clear too. Some folks have drilled them slightly larger to allow for the water to flow out faster.

3) Finally, you may want to replace the weatherstripping (it's gets old and cracked and dries out) that holds the windows in place. Most of the fiberglass campers have clamp ring style windows that I think seal better by clamping to the fiberglass. The Uhaul windows are different in that they sit inside a weather stripping seal that surrounds the hole in the fiberglass. I have not done this yet but I plan to and I will document what I do when I get around to it. My Uhaul came with one window busted out and a plexyglass piece in place. That's the worst leak I had to deal with was that window. I did get my hands on another Uhaul window (rare) and I'm planning to pull out the plexiglass and put in the new one. More to come on that when I get around to doing it....

For now I have no leaks. So I'm happy.