Showing posts with label electrical. Show all posts

Sunday, June 14, 2020

Camper Electrical (Part 3: Lighting Upgrades)

Uhaul Camper Lighting Upgrades
Lighting really sets a mood. With a small 13-foot camper, packed with parents, kids, and dogs, it can get really small feeling on rainy days. The original lighting was a 2 bulb light over the sink, florescent tube over the closet door, and the stove hood light. None of those provide great light for reading, especially at night (if you want the kids to sleep). I replaced the 2 bayonet bulbs over the sink with LED bulbs years ago which were brighter. But since I was redoing the electrical, why not upgrade the lighting?

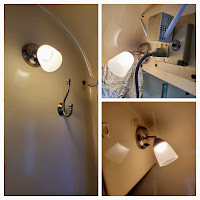
Collage of new lighting fixtures in Uhaul Camper
One of the top priorities was to add more lights that could be individually turned on/off and positioned for reading. I wanted us to have lights as well as the kids in the bunks. After evaluating all the LED lighting out there, we settled on these warm white bedside reading lights. They come in a two pack and I bought four total. I installed one on each side of the camper over the main bed, one near the door, and one on the side of the upper cabinet over the upper bunk. They simple to install with just 2 wires (positive/negative). They provide a nice glow and really set the mood even if we aren't using them for reading. I was glad to get one installed for my son to use over the upper bunk since it tends to be pretty dark with the normal lighting over there. 

Next, I upgraded the light over the stove with a warm white LED option. These are great and match the warm white of the other lights. I did buy the 2-pack and installed the other on the side of the cabinet next to the lower bunk for my daughter to have as an option. I did this since it was fairly flat and doesn't hinder the bunk flipping up/down like the reading lights would've. 
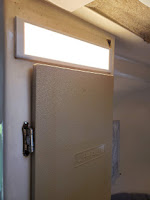
Light over closet door in U-haul CamperOver the closet door, I was originally going to replace the fluorescent tube light with strip LED lights inside the cover of the original light. I didn't like the way that looked and instead went with a touch panel light that is warm white but really bright and almost makes it look like daytime in the camper. 

Inside the closet, I decided to add a small light to give better visibility. I went with this touch light

The last lighting I added was inside the upper cabinets. Since I had spray painted the cabinets granite gray, they were a bit dark inside. I devised a method to use a cabinet door switch and some license plate LED lights. I wanted light that shined back into the cabinet rather than in my face. License plate lights are directional since they're designed to direct the light down onto the license plate. This worked out perfectly and provides ample, directional lighting in a small footprint. 

So you may be asking what about the stove hood light? Well stay tuned for another post in the near future that discusses that and a few other mods we recently did. 

If you're interested in the other Camper Electrical posts, check them out below:
Camper Electrical (Part 1)

Wednesday, April 15, 2020

Camper Electrical (Part 2: Converter upgrade)

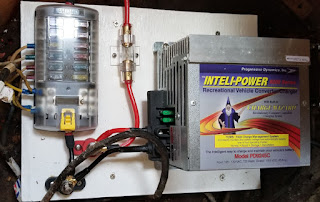
Progressive Dynamics PD9245C with Blue Sea Systems 12 circuit fuse block
With the COVID-19 quarantine, I've found some more time in my schedule due to kids events/sports all being canceled. This has allowed me to start to tackle some camper projects that have been on the list for a while. The converter upgrade and some electrical updates were on the list for a while. As a matter of fact, the first post I did on the camper electrical was from 6 yrs ago! Feel free to check that one out for an overview of the system and early updates. (Note: In this post, I'll link to the manufacturer site for items I used so you can get the most up to date and complete info on the equipment, but I did buy a lot of it via Amazon when I could.)

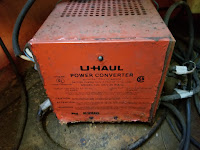
Original Uhaul Camper Converter
I really have to give credit to U-haul for making these things well so they just run and run. I bought a converter a few years ago to replace the original, but we didn't have any issues with the original so I just kept running with it. It finally died last year. The old converter had a fuse block built in using glass tube fuses. The old converter, being from early 1980s wasn't smart enough to adjust charging rates so as to not "cook" a battery if left plugged in. So I was specifically looking to upgrade that capability when I went looking for a new one. Based on my load calculations, I settled on the Progressive Dynamics PD9245C 45 amp converter. This converter differs from the original in that you have to get and wire in a separate fuse box. (Some folks have moved to a PD4045 which is more of an all in one solution but you need to cut an opening somewhere under the bed/table area to surface mount it.)
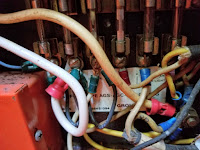
Fuse board inside the original Uhaul Converter

Molded fiberglass campers, I've found, have a lot in common with boats. So when I started looking for 12v electrical components, I researched some 12v boat applications and suppliers. I settled on a 12 circuit fuse block with negative bus from Blue Sea Systems. This would give me enough room to expand beyond the original 6 circuits. I've used the 6 circuit block in the back of my Jeep for expanded needs along with Blue Sea 12v sockets and usb charging ports and have been satisfied with their equipment. I decided to move from the glass tube fuses to regular automotive spade fuses which is why I went with that specific block cause they're cheap and easy to find (and I carry spares for the car anyways). The negative bus is also a nice feature for the camper since most of the existing wiring is 2-wire. The original had a single connection point for all the grounds to connect to. The other major components I added were:


Blue Sea Systems 12 circuit fuse block
I built a small elevated platform to mount everything to and to help me organize it. The old converter was directly wired to the AC system and the new one came with a male plug. So I got a female plug from Lowes locally and wired it in to the existing original power line. The converter is connected to the distribution posts. Those in turn are connected to the fuse block and negative bus. The positive line has the 80 amp inline fuse for protection of the block. (Note the block is rated to 100 amps so I'm well below that rating.) I should never really be pulling anywhere close to that amount since I'm only using LED lights, Fantastic Fan, a few 12v charging ports, and the stove hood (I removed the original heater so that's not a load anymore). The battery will be connected to the distribution posts also (more to come on this). I put the pendant and capacity monitor in place of the old analog capacity monitor near the door.

new charge control pendant and digital battery monitor
I was able to install the new setup and hook up the original wiring without any issues. I have not hooked up the battery yet as I am planning to move it from inside to the tongue of the trailer. I also did not hook up the old solar panel and solar charge unit as I know that the original panel is not working anymore. I plan to look into solar in the future. I did run into one issue which was the GFCI outlet above the sink was bad and kept tripping. After taking it out and testing it on a single circuit by itself, I determined that I needed to replace it.

12v socket/ USB outlet combo

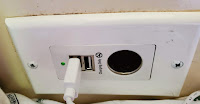
4 USB charging portsWhile I was working on the 12v side of things, I also made a few more updates. I pulled out the old ash trays on either side of the main bed/table area and replaced them with a 4 port USB charging socket and a 12v socket/2 USB charging port socket and wired these into 2 of the extra points on the fuse block. I also did some lighting updates that I'll go into more detail on in another post.

I hope you find this helpful if you decide to dive into redoing electrical in your camper. Next on my list is to build onto the tongue to house the battery up front and wire it into the system. I'll post details on that once I get it completed.


Monday, March 24, 2014

From Uhaul Swamp Cooler to Fantastic Fan

Camping in the south means heat and humidity. So I had to laugh when we brought the little fiberglass camper home and I discovered it had a swamp cooler installed. If there's one thing I don't need in Georgia, it's a swamp cooler. (I'm assuming that a large portion of the U-haul camper rental fleet was aimed at the western states.) So we used just the fan part of it but I didn't like the bulk on the roof. And the fan wasn't that great.

Due to a summer trip and lack of time, I opted to have a shop rip the old swamp cooler off and install a fantastic fan. They were able to use the existing 12v wiring. We're really happy with it and it adds some natural light in the camper and has much better airflow. 
old swamp cooler and fan in Uhaul CT13 camper new fantastic fan upgrade in Uhaul CT13 Camper
Out with the oldIn with the new
So why not go with a rooftop air conditioner? Well first there's the expense. I didn't feel like dropping that kind of money since we'd just had to get a newer car (GMC Acadia). Second, I've read, and can understand from looking at the camper design, that the weight of one of those units could be too much for the top without adding some reinforcement inside. So I took the easier route. The other options are a window unit on the rear sliding window with probably some fabricated mount that connects down to the bumper for some support or cutting out the front lower storage bin near the door and adding external venting and installing one there. Both of those require more work than I was willing to put into it at that time. We'll see in the future if I decide to do one of those. There are pro's and cons to both.

Wednesday, March 19, 2014

Camper Electrical Part 1

So electrical is a big part of any camper. Let me start by saying the Uhaul's come in two models: CT13 and VT16. Mine is a CT13 and so that's what I'll be talking about here. Though much of this is the same across many campers. It can also be confusing unless you understand that there are 3 electrical systems in these small campers:
  1. AC (120V on a 15 or 30 amp circuit). This is your normal household current and the receptacles in the camper look like a typical household plug. If you're not plugged into shore power then your items that rely on this won't work.
  2. DC (12V). This is the items in the camper powered by your battery and converter. Most of the internal lights, fans run off this. This is the same 12V power as your car. Unlike in your car where you have an engine turning an alternator to produce the electrical current, campers have a converter. It's a device that converts the AC to DC and charges the battery. 
  3. Trailer lights (brake, turn, running). While the AC and DC systems are connected by the converter, the trailer light wiring is totally isolated from the other systems. It's power comes from the tow vehicle via the 4-, 5-, or 7- pin adapter that you hook up when towing. It includes the brake lights, turn signals, and running lights. 
I started with the AC system. One reason is because I was replacing the dorm fridge in my unit. These units originally came with just an ice box. But mine, like many I've seen, had been ripped out in favor of a fridge. I happened to have a slightly larger, stainless model that I used to use at my office at my old job. I had it in storage since I changed jobs and decided to replace it cause it looked better than the old brown one the previous owner had installed. 

I also had been having an issue during our first two trips with the thermal circuit breaker popping. After carefully adding up the amps I was using when it popped, I was way under 15 amps. So this led me to the conclusion after a little research that the old thermal breaker was worn out. These breakers do tend to pop at lower and lower voltages as time goes on. So 30 yrs later, this breaker was shot. I managed to find a replacement online. So I ordered one of those to install.
utility hookukp box on driver side of Uhaul camper with water and electric

So first things first. Shore power comes via an electric cord that is stuffed inside the shell. It comes out the utility port on the driver side. You pull it out to plug in. When you're done, you can push the cord back into the wall of the camper. I may end up replacing the cord in the future if I decide to upgrade to a 30 amp system. If I do, I'll replace it with 10-3 type SJOOW electrical cable.
electrical diagram of Uhaul CT13 camper from manual
Inside electrical outlet box in Uhaul CT13 camperThe power cord goes up to an electrical box where the single outlet and pop-out circuit breaker are on the side of the cabinet over the sink. There is another cable that goes out from this box to the converter (to convert the AC to DC to charge the battery and run the lights/fans while plugged into shore power). The previous owner of mine had run another cable from her down to the area below the sink with a female plug on the end to plug the dorm fridge into.

thermal pop-out button circuit breaker on Uhaul CT13 Camper
First thing before you begin working on AC is to make sure you're not plugged into shore power. Next I took off the outlet and separated it from the box. Then unplugged the circuit breaker and replaced it with the new one. I got a Sea Dog 15amp thermal push button breaker. I had to widen the hole a little bit as the diameter of the new one was a big larger than the old one.

extension cord with outlet box in cabinet below sink in Uhaul CT13 camper
I decided a few more outlets would be helpful. After cutting the fiberglass to widen the fridge area to fit my new larger fridge, it's a messy job and I'm afraid I may not be as skilled at patching holes in fiberglass. So I wanted to limit holes. I picked up an 8-ft, 4 outlet shop extension box from Lowes. I liked that it has it's own circuit breaker built-in and an on/off switch. I connected this to the extension from the top cabinet. I cut a hole in the sized of the cabinet under the sink (it's plastic and easier to deal with). I then put a couple screws in and hung the box on high on the back wall of the cabinet. We don't use that cabinet for much and nothing tall so it was a good spot. I plugged the fridge into that box and it leaves me with 3 outlets without having to install boxes and face plates.

As a side note, I cut a piece of an old rubber car floor mat and riveted it to the side of cabinet over the hole I had cut. I then slit the rubber so I could pass the plugs through. It was a quick way to cover the hole and hopefully provide a little insulation and better looking to me than an open hole.

I'm happy with the outcome. I may go back and upgrade to a 30 amp system at some point. The new pop-out circuit breaker fixed the problem I was having. I'll dive into the other electrical systems in the future as I tackle them.