Wednesday, December 29, 2021

Epic Adventure 3: Homesteading and the Oregon Trail (Part 1)

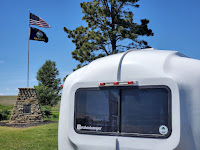
Uhaul CT-13 Camper at the welcome center in Lebanon, KS.
Welcome Center, Lebanon, KS


2020 was a year that I focused mostly on upgrades to the camper as travel was difficult. We decided to try for another epic road trip in 2021. It's been a busy year so I'm just getting around to writing up about our trip. Building on a route I had been working on for a few years, we decided to check off one of my bucket list items in early summer, Yellowstone National Park. So with the school wrapping up and my busy summer season closing in, we launched out for a 16-day, 5000+ mile journey west to squeeze in some adventure before the summer heat and crowds could bring our spirits down. 

Last time we headed out west was October 2013. That trip was to hit up South Dakota and take the kids to Mount Rushmore and the Badlands. Unfortunately, a government shutdown had impacted our trip and we never really got to enter the Badlands. This time we were going further west, but hoped to route back through the Badlands on our return. We left Georgia and began our same route up through St. Louis and over to Kansas City. From there, we continued on to Beatrice, Nebraska. It's a small town in the middle of nowhere but has a nice quiet campground, Riverside Park Campground, we were able to stop for a night. It's run by the city and was only $20 for the night. Nice pads and hookups. Definitely a nice little gem of a place to crash for a night on your way through. 

Homestead National Historic Site

The main reason we stopped in Beatrice was because we wanted to visit Homestead National Historic Site just west of the city.  Homestead is a historical look into the laws, people, and places that were tied to the Homestead Acts passed in the 1860s. The earliest people to push west took the Oregon Trail for an opportunity at land in Oregon in the 1850s. This was prior to the Homestead Acts in the 1860s, but the Homestead Acts help push more settlers into the other parts of the west like Nebraska. The last homesteader actually completed his requirements to obtain land in Alaska in 1979 a few years before the Homestead Act was repealed.
Inside cabin at Homestead NHS.

This was an important stop on our history lessons for the trip with the kids. Later we would dive more into the Oregon Trail with them. The staff at Homestead were super friendly. I would recommend stopping in for a bit of history and to say hi if you're in the area.

Uhaul CT-13 Camper at the geographic center of the lower 48 states

After leaving Homestead NHS, we dipped down into Kansas to visit the Geographic Center of the Contiguous United States (aka the lower 48). Just outside the small town of Lebanon, Kansas, this stop is somewhere you have to put on your agenda if you want to see it because you won't just stumble on it. It's almost halfway between I70 and I80 in the middle of nowhere. It was an hour and a half detour from our original route but the closest we could see ever being to it. So we decided to get a photo before moving on.

Gothenburg Pony Express Station

As we headed northwest, we stopped in Gothenburg, Nebraska at the Pony Express Station for another history lesson on the early days of mail delivery. The Pony Express Trail and the Oregon Trail (along with the California and Mormon Pioneer Trails) follow the same path through Nebraska and into Wyoming. They diverge in western Wyoming with the Oregon Trail headed on a northwestern route and the others dipping southwest to Salt Lake City, Utah. From Gothenburg, we followed the Oregon Trail up into Wyoming. 

More Oregon Trail adventures to follow in Part 2!

Wednesday, October 28, 2020

A Gap, a Boat, and a Cave

U-haul CT-13 Fiberglass Camper at Cumberland Falls
Due to Covid19, our summer vacation plans got rearranged. We were planning a trip to Florida and Disney originally since I had to go to a conference down there in July. That was all canceled and so we looked at the map and decided to take a different trip this year. We headed north instead to Kentucky. 

Cumberland Gap and Cumberland Falls

Our first stop was to camp at Falls Creek Cabins and Campground in south eastern Kentucky near Cumberland Falls. Due to Covid19 it wasn't very busy, but this seemed like a nice place to stay. There are various campsites and many cabins for rent. The site also is home to an outdoor recreation center that includes zip lines and rafting/kayaking. They also have grubbing for gem stones/arrowheads, which the kids really enjoyed. We drove down the road a mile or so to Cumberland Falls State Park. The views of the falls and the river are really amazing, We enjoyed walking the trails and watching the falls. 

Cumberland Falls State Park, Kentucky

After Cumberland Falls, we headed over to Cumberland Gap. It's about an 1.5 hour drive over to the corner of Kentucky where it meets Virginia and Tennessee. Cumberland Gap is steeped in history. From its use by Native American tribes, to Daniel Boone and the forming of the Wilderness Road to open up the frontier to colonists, Cumberland Gap has played a key role in American History. Cumberland Gap National Historic Park aims to protect the land and teach future generations of the area's importance. Due to having the camper attached, we could not drive up to Pinnacle Overlook unfortunately. They do not allow trailers on the twisty road, and I didn't feel like leaving it in the parking lot of the welcome center. The cave tours were also not running due to Covid19. 

The Ark Encounter, Big Bone Lick SP, and the Creation Museum

U-haul CT-13 Fiberglass Camper at Big Bone Lick State Park, Kentucky.
After exploring the southeastern part of the state, we headed northwest. Our next campsite found us at Big Bone Lick State Park just southwest of Cincinnati, Ohio. The site is known for fossils and mammoth bones found there, and the welcome center has a lot of that history documented for visitors to view. There is also a bison herd housed here and they frequently have programs where you can get up close and learn about the bison. The kids really enjoyed the bison program and seeing them so close. The campground is nice and on top of a small mountain. It seemed to be a very popular campground and was full during the weekend. They were also doing a Christmas in July campground parade and decorating competition which made the campground super festive and fun. We definitely enjoyed our time here and the other campers we met were very friendly. The campground almost felt like a small, friendly town. 

Ark Encounter, Kentucky
While staying at Big Bone Lick, we ventured out to the Creation Museum and the Ark Encounter. I picked this state park due to it's location about the same distance from both of those attractions. We had bought combo tickets for both attractions. We visited the Ark Encounter first and it was a Friday. It wasn't too crowded but there is a lot to see and do. We spent most of the day there touring the Ark reproduction and visiting the outside animal exhibits. The kids even got to ride camels! We took our own lunch and bottles of water. The Ark provides kids a full experience of what things might have looked like and how they worked as well as providing adults with thought provoking statements and questions. We enjoyed our time there, and I definite suggest planning for a full day of maybe 5 hours or so. 

The next day we ventured to the Creation Museum. They had an outdoor garden area and animals that the kids enjoyed. Much of the main experience is inside the main museum. There is a 4D theatre and a long winding path through various rooms discussion creation, the flood, and other events from the Bible. I would say that the kids definitely had a more fun and engaging experience at the Ark. The Creation Museum is more thinking and reading focused, and I would not recommend for kids younger than middle school. Most of the younger kids I saw there were ready to move on to the next thing faster than their parents could read the content. So if you are interested in visiting these and have young children, stick to the Ark and save a little money. Adults would probably enjoy the museum more, but I do feel like a chunk of it was repetitive to what we saw at the Ark the day before. I think they could probably wrap the Creation Museum experience into the Ark Encounter and just have a single attraction. 

Mammoth Cave NP, Lincoln Birthplace NHP, and Lincoln Boyhood Home NM

The first Abraham Lincoln Memorial at Abraham Lincoln Birthplace NP, Kentucky.
We left Big Bone Lick and headed southwest towards Louisville. Our ultimate destination was Mammoth Cave National Park. However, we had a couple of stops before we reached it. We stopped at Lincoln Birthplace NHP and Lincoln's Boyhood Home NM. Lincoln was born and spent the early part of his life in Hodgenville, Kentucky just south of Louisville before moving to Indiana. The two sites are about 15 mins apart on opposite sides of town. Don't miss driving through Hodgenville though to see the town square with the boy and man statues of Lincoln peering across the square at each other. Lincoln Birthplace NHP is the site of the first Lincoln Memorial built around 1907. The well known Lincoln Memorial in D.C. has a similar exterior look to this one and was built after this one. After touring the sites and letting the kids complete their Jr. Ranger badges, we drove south. 

Entrance to Mammoth Cave
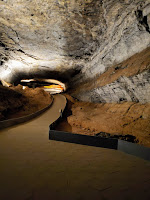
Our last destination of the trip was Mammoth Cave National Park. Mammoth Cave is the world's longest known cave system. There are lots of different tours available for various caves in the park, but the they were only offering self-guided tours of the main cave during our visit due to Covid19. There were limited numbers allowed, and they forced spaced entry by family. Get your tickets ahead of time! I got there early in the morning on a Monday and had to settle for 1pm ticket time. By the time we got back after lunch for our tour, they were sold out till Thurs of that week! I had made a poor assumption that due to Covid19 and it being a Monday it would be slow. Fortunately we were able to get in. The main cave is huge and splits off of the largest room in two directions. We headed down the longest side first and then returned to the main room to take the other path. It's not as muddy as some caves I've been in and there was plenty of room to spread around. 

Inside Mammoth Cave
They had rangers stationed throughout the cave off the paths to answer questions or help as needed. All the rangers we met were super friendly and helpful. Many of them had lanterns, but a few were sitting in the dark. It soon became a game with the kids of how many rangers can you spot in the cave. Make sure to take a flashlight or headlamp. (My apologies to the ranger hiding in the dark that got blinded by my headlamp light!) It's also cool down there though not as cold as I have seen in some caves. Since it was July, I was happy we were walking in the cave and not hiking outside it. 

Overall, we had a great little trip and were able to check some National Parks off our list. If you're looking for a little one week loop through Kentucky, these would be some fun options. 

Wednesday, September 16, 2020

Freshening Up Our U-haul Camper

U-haul CT-13 Interior

As things age, sometimes they need a little face lift. With a vintage camper, it's a bit tougher to decide what to do. Do you totally overhaul everything with a new look and feel? Or do you try to restore to original beauty? While my primary focus had been updates to the electrical system, I decided to use my new found energy and tackle some other things on the list. 

Curtains 

One of the first things we decided on was a color scheme. Originally, we started with a brown theme for the main bed and fun kid theme for the bunks. We had moved to wanting a more gray and white theme. My wife worked on bedding, sewing some throw pillows, and making new curtains (our 3rd set of curtains). For the curtains, she decided to use cloth shower curtain material since it holds up better to the moisture. Since we live in humid Georgia, and if the camper is closed up for a period of time, moister can build up from the fiberglass walls sweating. We definitely had a set of curtains get ruined by mildew in the past over a winter. I've since used damprid and sometimes a humidifier over the winter in there to try to keep it dryer. She found a shower curtain with a pattern she liked, cut it up, and made new curtains. We used 1 inch rings. I removed the rings and used the hooks with the clamps to hang on the original curtain wires. We got rid of the bottom wires and only use the top wire for hanging curtains now because it makes them easier to move.

Bedding

U-haul CT-13 main bed and curtains
So we made decision to keep the rear bed full time. I bought and cut 3/4 inch plywood to be a base. Placed it over the seats from one wall to the other. I removed the table top all together. This gave us a bit more height under the bed and made the bed more stable. I kept the original cushions and purchased a memory foam topper. I found a 4" memory foam topper in full size at Sam's Club. I used an electric knife to cut the topper so it fit the curves of the back wall. We put the topper in a zippered mattress cover to help keep it protected. Previously we had a feather mattress topper but the memory foam is much more comfortable and less lumpy. A full fitted sheet fits well around both the topper and the cushions. 

U-haul CT-13 Bunk Beds

The bunk beds (see previous post on original makeover for smaller kids) have gotten a lot of use with our kids. As they've grown, we've needed to adjust the space a little bit. They got new bedding to go with their new lighting we'd added (see post on lighting updates). We originally had a piece of fabric between the two posts to keep our daughter from rolling out in the night. Now that she's older, crawling into her cave from the end was becoming a bit more challenging. So we removed that and I reused one of the lower curtain wires to string across the top of the posts. My wife sewed two small curtains with ties attached that can be tied to each post or untied and closed for privacy. Our daughter enjoys being able to enter the bottom bunk from between the posts now and still having her private cave. 

Cabinets and Closets

U-haul CT-13 Upper cabinets painted Charcoal Gray

In trying to find a balance between keeping the original feel/charm and updating, I opted to keep the cabinet and closet doors and paint them. I used Rustoleum Painters Touch spray paint in Satin Granite. I am really happy with the way they turned out. They look fresh and you can still see the texture and U-haul name on them. I also replaced the hinges which were starting to rust. The screw holes for the new hinges were just a bit off but the way they cover the old holes it wasn't a problem for me. I went with stainless steel which are a bit more but should hold up for a long time. I also spray painted the upper cabinet inserts and added lighting (see my post on lighting for how I did that).  

U-haul CT-13 Closet updated with shelves and charcoal gray paint.

I decided to update the closet while I was at it. We've had a 3 drawer plastic thing in there for years, but I wanted something a bit more stable. I wanted to use small clear containers with lids to organize so i could easily see what was inside and have some flexibility with the storage. When doing the lighting updates, I'd put some wood inside the closet to drill into and hold the lights. I took those down and cut some 3/4 inch plywood to form sides and then used some 1/2 inch wood to make shelves. Going with the theme, I painted them the same Satin Granite. 

In an attempt to maximize storage, I removed the old propane heater. It was problematic and loud. This left a large area under the closet that I could work with. I installed a ClosetMaid 11-inch wide organizer that slides on a track. This organizer is 20 inches deep and has a ton of room in it. Since it slides, it also is easy to access. 

Counter

U-haul Ct-13 counter upgrade with new sink, faucet, and stove

The biggest project by far was the counter. I crafted a wood counter top to fit over the fiberglass counter. I had previously purchased a new Dometic SMEV PI8022 stove years ago. The new stove sinks down into the counter and has a glass top that closes over it to provide additional counter space. It also makes the space feel bigger since there's more room between the top of the stove and the hood. The old hood was rusting and had electrical issues so I replaced it with a new hood

Since I had to cut the bolts off the original sink and it was showing signs of wear, I opted to buy a new one that was the same size. The one I bought also came with the drain hardware but it was plastic not stainless. So I went to Lowes and bought a Stainless Steel drain with a strainer/basket to install. I also decided to upgrade the faucet. The old 2-way faucet is the normal one found in pop-up campers. It's designed to pump manually for onboard water, or hold down when city water is hooked up. Since we don't use the onboard water tank, I wanted to install a nice looking faucet that would work with city water. (If I ever decide to use the onboard, I'll look into an electric water pump.) This opens up the realm of faucets to anything on the market for homes too. I found that a bar faucet is the perfect size. It's not a full size kitchen faucet that's super tall, and not a tiny bathroom faucet. It's the Goldilocks faucet. When installing a new faucet, you need to be aware if you have hot water or not. We don't, so that meant I had 2 options for the hot water feed line: cap it off or connect it with a T connector to the cold water line. I opted for the second option since it would allow the water to flow through both lines no matter whether the handle was directed towards hot or cold. If you opt to cap the hot water line, you will find you need to adjust the handle to full cold to get maximum flow. 

I'm really glad that life slowed down enough to get some updates done. We're happy with the results so far and will continue working on our list of things we'd like to update. I'm investigating adding air conditioning to the camper to make it more usable in the hot, muggy southern summer months and there's a few more electrical updates I'd like to tackle. More to come...

Sunday, June 14, 2020

Camper Electrical (Part 3: Lighting Upgrades)

Uhaul Camper Lighting Upgrades
Lighting really sets a mood. With a small 13-foot camper, packed with parents, kids, and dogs, it can get really small feeling on rainy days. The original lighting was a 2 bulb light over the sink, florescent tube over the closet door, and the stove hood light. None of those provide great light for reading, especially at night (if you want the kids to sleep). I replaced the 2 bayonet bulbs over the sink with LED bulbs years ago which were brighter. But since I was redoing the electrical, why not upgrade the lighting?

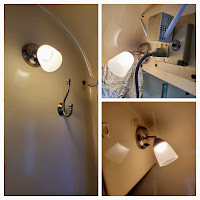
Collage of new lighting fixtures in Uhaul Camper
One of the top priorities was to add more lights that could be individually turned on/off and positioned for reading. I wanted us to have lights as well as the kids in the bunks. After evaluating all the LED lighting out there, we settled on these warm white bedside reading lights. They come in a two pack and I bought four total. I installed one on each side of the camper over the main bed, one near the door, and one on the side of the upper cabinet over the upper bunk. They simple to install with just 2 wires (positive/negative). They provide a nice glow and really set the mood even if we aren't using them for reading. I was glad to get one installed for my son to use over the upper bunk since it tends to be pretty dark with the normal lighting over there. 

Next, I upgraded the light over the stove with a warm white LED option. These are great and match the warm white of the other lights. I did buy the 2-pack and installed the other on the side of the cabinet next to the lower bunk for my daughter to have as an option. I did this since it was fairly flat and doesn't hinder the bunk flipping up/down like the reading lights would've. 

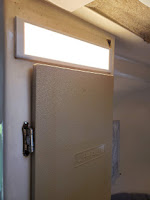
Light over closet door in U-haul CamperOver the closet door, I was originally going to replace the fluorescent tube light with strip LED lights inside the cover of the original light. I didn't like the way that looked and instead went with a touch panel light that is warm white but really bright and almost makes it look like daytime in the camper. 

Inside the closet, I decided to add a small light to give better visibility. I went with this touch light

The last lighting I added was inside the upper cabinets. Since I had spray painted the cabinets granite gray, they were a bit dark inside. I devised a method to use a cabinet door switch and some license plate LED lights. I wanted light that shined back into the cabinet rather than in my face. License plate lights are directional since they're designed to direct the light down onto the license plate. This worked out perfectly and provides ample, directional lighting in a small footprint. 

So you may be asking what about the stove hood light? Well stay tuned for another post in the near future that discusses that and a few other mods we recently did. 

If you're interested in the other Camper Electrical posts, check them out below:
Camper Electrical (Part 1)