Monday, June 19, 2017

The Second Spare


new spare tire mount on Uhaul Camper CT-13 tongue
Previously, I had mounted a spare tire on the rear bumper. With planning for another long trip coming up, I decided I'd like to add a second spare to the tongue. I bought the same adapter I had used before. The question was, where to mount it as the tongue is a very busy place. Between the propane tank holder, jack, handle, and coupler, there's a lot already going on there. Then add the wiring and you have to make sure if you drill new holes somewhere that you're very careful where.

I opted to use existing holes. The coupler is attached with three .5 inch hex bolts and has the handle welded to the top of it. The tire mount comes with 4.5 inch long .5 hex bolts. These are the same size just longer. So I removed to rear two hex bolts from the coupler and attached mount there without having to drill new holes. I used the bottom holes because they are spaced perfectly and I wanted the tire to be high so no chance of it hitting the ground. I had to mount on drivers side due to the jack being on the passenger side. I also had to make sure because the bolts were long that they pointed the right direction so the tire could mount flat against the side of the tongue (didn't want them poking or rubbing a hole in the sidewall). The back plate that came with the tire mount wouldn't work as it was too thick and blocked the jack from swinging into place. So I got a kit at the auto parts store for hanging leaf springs and used a U-bolt from the back to add a little more support. I may keep my eyes open for a thinner back plate or try to make one in the future but for now it's secure.

back side view of new spare tire mount on tongue of Uhaul CT-13 camper

I think this will work out and was an easy mod. Having 2 spares on the trailer is a good insurance policy for the long hauls. I've also bought a bottle jack to keep in the trailer.

Wednesday, June 14, 2017

Lets Talk Hinges

Polar 402 hinges on U-haul Camper (CT-13)
Door sag. It's annoying to say the least, but it's also a sign of some other issues. So catching it early can save you some bigger repairs later. The door hinges on the U-Haul campers are Polar hinges. Same kind that are used on industrial freezers. The original hinges are model 402, but they don't make them anymore so you may have to grab model 412 if you do need a new hinge. The hinges are not cheap, right now I've seen them running around $30 something a piece. Most of the time the weak point isn't the hinge though since there made so durable. It's the screws, bolts and wood that they attach to that fails first.

Old bolt and nut from door hinge.
Out with the old.
Inside the camper you can find where the hinge bolts are as they're behind the little black 1 inch caps on the door and panel next to the door. Pop those caps out and you'll have access to the back end of the bots. The nuts on mine were rusted solid to the bolts, and they had worn out in the wood. So they were loose on the lower hinge (door side). I had to hacksaw mine off. I recommend replacing the nuts, bolts, and screws with stainless hardware. Stainless is more expensive but it doesn't rust. And trust me you don't want to have to replace these in a year cause you bought cheap hardware. Where the door hinges are, there is wood fiberglassed inside the door and wall to mount them too. Sometimes due to wear or a leak, this wood can start to rot. Depending on how much rot you have, you may be looking at a bigger job by having to replace those wood pieces. If you are lucky, like mine fortunately, you may catch it before a lot of damage. With mine, the lower hinge on the door side were seeing the 2 bolts wearing out and being loose. Also someone had previously put cheap screws into the screw holes which were rusting so I was going to change those at the same time.

New bolts and t-nuts for door hinges.
In with the new.
I used 10-24x2in stainless Oval machine bolts which matched up to what was there. Some folks have used flat washers and lock nuts. Due to wear I could tell the holes in the wood had worn out some and were a bit bigger than the 10-24 bolts. So I opted to go with t-nuts. The t-nuts are designed to dig into the wood and grip against it vs just being a bolt against a washer. I put the new hardware in after using the hacksaw to remove the old ones. I also removed the rusty screws and replaced with 10-24x1in stainless screws. My screws were a bit longer so that they could dig deeper into the wood than the original. This job can be easier if you have a friend willing to help. Then one of you can work from the inside and one from the outside. Also be careful backing out rusty screws as they can sometimes tear up the wood on their way out if they've rusted a lot. Take it slow and use a hand held screw driver not a drill.

Tip: When working with tiny bolts and the t-nuts in the tiny openings, you can't fit your fingers ( could only fit one) in there to thread the nuts on the bolts. So what I did was take another bolt and back screw it halfway into the t-bolt and then use that to help thread it on the bolt from the front. Once the front has gotten halfway threaded, I backed out the other bolt and tightened the front bolt down. I did use my finger to push the t-nuts against the wood and hold them while tightening.
back threaded t-nut
T-nut back threaded halfway with bolt to hold in place in hole while threading the regular bolt through the wall of the camper.

With the new hardware the hinges are again secure. Hopefully, I won't see any more bolts coming loose when I'm driving and the door will be more secure. All in all a quick maintenance job.

Thursday, June 8, 2017

Facelift

U-haul Fiberglass Camper with fresh paint
I got a good deal when I bought our little camper years ago, but it did need some work. I've gradually spent time and a little money over the years to upgrade and replace/fix things. Two things have been on my list for a long time: paint and replace the patched in plexiglass side window.


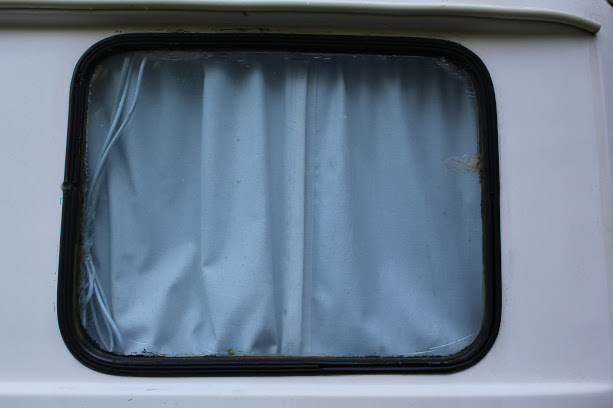
old plexiglass window
Old Plexiglass Window
New Old Stock Window
Someone had busted out the original side window in the past and of course hadn't saved the frame. Some previous owner had stuck a chipped and cracked scrap piece of plexiglass in there and then calked it up real ugly. Due to that, the window had no way to open to provide ventilation on that side. Several years back a company that specialized in selling surplus from warehouses, opened a crate they'd gotten their hands on. Inside were a bunch of windows with Uhaul stamped on them. Well they posted them for sale on their website. Didn't take long before a group of us stumbled on them and they were sold out in a couple days. NOS (New Old Stock) Uhaul windows for the campers that Uhaul had claimed they didn't have any for years. At some point they had a batch of replacements and had gotten rid of them I guess while cleaning out a warehouse. I talked to the folks at the company and they said they bought a bunch of stuff in crates from somewhere all site unseen. They had no idea what was in the crates till they opened them at their warehouse. And even then they didn't know what they went to. So with luck I landed 2 of them a right and left side. (I have the other as a spare in case one of them ever gets busted.) Well this week I finally got that installed by a window guy. Thrilled to have finally gotten around to it.


U-haul Fiberglass Camper before fresh paint
Before New Paint (but freshly cleaned)
U-haul Fiberglass Camper with fresh paint
After New Paint (Shiny!)
The one thing that is the most noticeable about the camper has always been the outside of course. Mine had lost most of it clearcoat and shine years ago and was mostly chalky and rough. It made it difficult to keep clean and when you did clean it, it was a chore. I had a couple of options: paint or wax. When adding layers of wax to the fiberglass campers,you have to use a lot of it. Most folks go with a ZEP floor wax and put on 5-6 layers. This gets it shiny but also leaves imperfections visible. You have to use barkeepers friend or similar product to really clean and whiten it. Mine ha a fiberglass patch that was visible and some discoloring due to water from rusty drain hole in rear window running down the back of it. With painting, the wife and I discussed what color for 2 years before we decided to keep it white. I took it to my bodyshop guy and he did her up nice with a new coat of paint in Super White. Now she's shiny and clean looking. He even painted the rock guard to match. It was a hard plastic with a rough finish to it and a bit yellowing. Now it's smooth and the same color as the camper. All in all, I'm happy we finally got her done up right. I feel the paint adds more to the value of the camper than just a wax job.

So with the facelift done, I'm turning my focus to some other tasks as I prepare for our next big adventure with her. More updates to come over the next month or two as we continue some work and find some time work in adventure.

Monday, October 3, 2016

Coleman 1-Burner Butane Stove Review

I've been using a Coleman 2-burner propane stove for years while car camping and camping with the U-haul camper. One of the burners on it went out after ~15 yrs of use. I may try to repair it, but in the mean time I was looking for a single burner stove that was quick an easy to use.

I like to cook outdoors, especially in the fall. (I always try to cook bacon outside on the back deck so I don't have to clean up the grease splatter in the kitchen.) I have a grill but not one with a side burner. So I went looking and researching for one that I could use at home, at the park, or while camping. I stumbled on the Coleman 1-Burner Butane Stove. You'll want to shop around as I've seen the price vary from $16-35.

This stove runs off butane instead of propane like many other camp stoves. The canisters are a bit smaller and should last at least an hour on full flame/heat. The nice thing about this stove is how easy it is to hook up the fuel. I've used a lot of different stoves over the years and most of them use a threaded design. This can be trouble for older children you're trying to teach how to use one and help out, older adults, and folks with dexterity issues (like rheumatoid arthritis or hand injuries for example). With this stove you don't have to thread/twist the canister on. Just drop it in the slot and push down on a lever that locks it into place and pressurizes the system. Then just turn the knob past max till it clicks and the igniter sparks into the gas. It's that easy and you're cooking!

There's other things I like about this little stove too. Check out my video review to see how easy it is to operate and what else I like about it! Whether you're using this for camping, boating, back yard BBQ, or as an emergency cooking source when your power goes out, it's a great versatile addition to your gear.

Click here to view the video on YouTube.

Click here to see my follow-up video to answer some questions.

Amazon source for fuel for these if you can't find it local.

Wednesday, September 28, 2016

Camping Where the Fish are...

U-haul fiberglass camper at Moccasin Creek State Park on Lake Burton.
It's been a busy, hot summer and I haven't had much time to get the family out for a camping trip. I was looking forward to the fall in hopes of getting one in when work and the weather cooled down. A couple months ago some guy friends and I began discussing a big family camp out. The last time we'd done this as a group, only two of us had kids. So we each cataloged our gear and booked a couple sites at Moccasin Creek State Park on Lake Burton in North Georgia.

My wife and another mom came along while the other moms stayed back with their younger kids (<1yr). We ended up with 8 adults and 11 children (most of them under 6yrs old). This was going to be many of the kids first time camping. As someone who's camped from hammocks and tarps to tents and our camper, I had the most gear and was able to cover us with 2 large tents to sleep most of the folks. We took our camper for our family and also because it made for a great way to haul a lot of the gear. We setup on two sites with our camper and large tent at one, and the other large tent and a smaller one on the other site. (Oh and I forgot to mention we took our 3 dogs which was another reason for taking the U-haul.)

View of Lake Burton from the dock at Moccasin Creek State Park.
Moccasin Creek State Park is located on Lake Burton in the North Georgia mountains. It's about half-way between the towns of Helen and Clayton. Moccasin Creek SP sits on the edge of Lake Burton where Moccasin Creek dumps into the lake. The park only has 54 camp sites; there are no cabins. The campground is relatively flat and well shaded for the most part. There is a boat ramp to put in boats and a couple docks to tie them up at so you don't have to necessarily put them in every day. There is also boat trailer parking at the campground. Unlike many of the other state parks in Georgia, this park isn't open year round (it's closed from Dec 1 through March 15).

We were setup on sites 14 and 25, which were the last 2 sites available when we booked. They also happen to be ADA sites and close to the restrooms (which was a bonus with little ones). While our sites were not near each other (unfortunately), most of the sites are fairly close together. Our neighbors were super friendly. They were from Athens and had camped there for 20 yrs. They seemed to know or be friends with everyone at the campground and were gracious enough to spot us a can of beans so we'd have enough for dinner one night. They had to be the nicest campground neighbors I've ever had the pleasure of meeting. So if you want to camp with friends, book in advance and you might get a few sites next to one another. If you want a bit of privacy, sites 37-39 might be the best option. Sites 1-5 are right on Moccasin Creek, but there's a walkway between you and the creek that folks use for accessing the creek for fishing. There is a church (Boat Church as it's referred to) that meets at the open air pavilion on Sunday mornings for a service right on the lake. Anyone is welcome from boaters on the lake to campground guests. I wasn't able to attend the service due to having to pack all the gear up, but we were close enough I could still hear them singing the old hymns which was nice. Depending on when you need to leave on a Sunday, you may want to plan to leave before or after the service. There are an influx of cars for the service which could make maneuvering a larger rig more challenging if you're near the pavilion. Most of the cars were gone by the time we left (which was probably 30 minutes after the service was over).

Fishing with the kids at Lake Burton Hatchery.
There is a section of the creek at the park that is only for kids and 65+ to fish. The hatchery next door has some stocked fishing ponds and we took the kids over there for some fun fishing Saturday morning. Each of my kids caught 3 small fish within an hour. They loved it and were so excited. I had to hold them at 3 each cause I could tell it was going to become a competition that might go all day.

Later in the afternoon we loaded up the kids and made our way over to Wildcat Creek to a sliding rock section on the creek. The water was really cold but the kids didn't seem to care. With some hammocks up for adults to relax in, we spent a good while there that afternoon. Eventually, we packed it in and headed home to fry some chicken strips up for dinner.

Tour of the Lake Burton Fish Hatchery.
Moccasin Creek State Park, as I mentioned, is right next to the Lake Burton Fish Hatchery. The hatchery raises trout and stocks Lake Burton and many of the trout streams in North Georgia. Here's a great video on what they do: (Lake Burton Fish Hatchery Video). On Sunday after we packed up camp, we took the kids over to the hatchery to look around. John, the hatchery manager (gentleman in the video), came out to talk to the kids. I wasn't expecting there to be anyone around on a Sunday morning. It was a nice surprise when he came out and engaged our small group to tell us about what they did there and answer questions. He even grabbed a bowl of fish food and let the kids feed the brown trout they were going to be releasing in a couple weeks! He's been working there for over 10 yrs.  He is a super nice man and really engaging with children. So if you stop by, tell him hi.

With the gear, dogs, and kids packed up, we started our trek homeward. We will definitely keep this place in mind for future trips. I'm thinking of coming back in the spring when they're stocking the creek so the kids can take a try at fishing for brown trout. Maybe we can even watch them loading up the fish in the trucks to release. I think the kids would get a kick out of that. Hopefully, next time we can stay longer as I think 2 nights was not enough time for us.